
Networking
Port forwarding behind CGNAT (Starlink, 4G, 5G) with WireGuard and a VPS
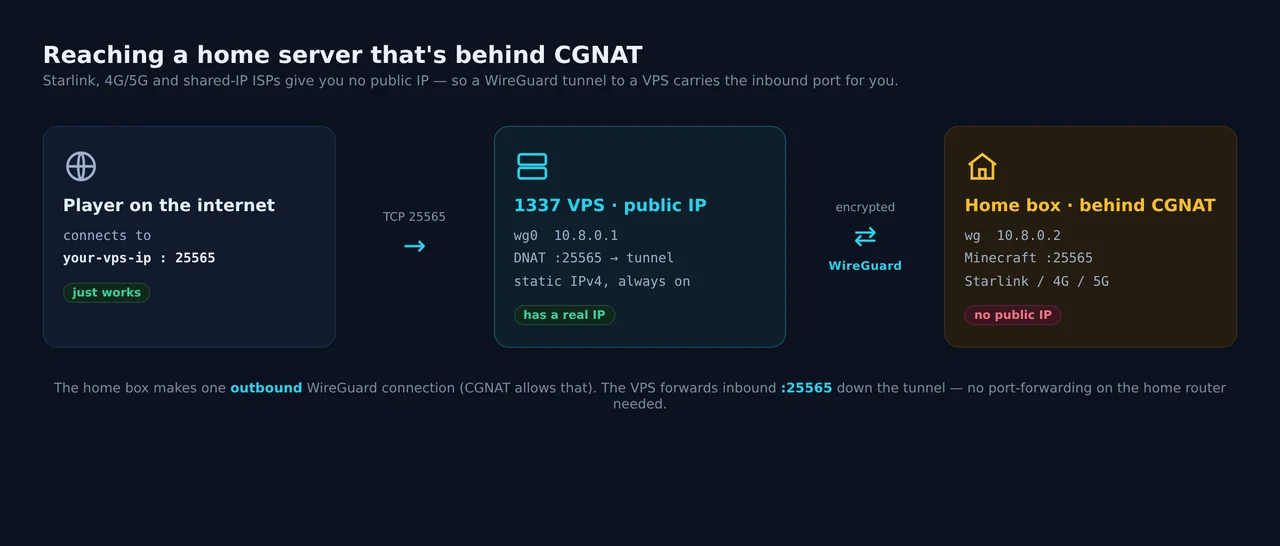
If you are on Starlink, a 4G/5G router, or a lot of fibre and cable plans, you have probably hit this wall: you want friends to join your home Minecraft server, or you want to reach a box at home from outside, but port forwarding on your router does nothing. The reason is CGNAT, and no amount of router fiddling fixes it. This guide routes around it with a small VPS and a WireGuard tunnel, and ends with a real Minecraft server at home that anyone can join through the VPS.
It builds on our WireGuard with wg-easy guide. If you have not set up wg-easy yet, do that first, then come back. It takes about twenty minutes from here.
The problem, in one line
CGNAT (carrier-grade NAT) means your ISP hands you a private address and shares one public IP across many customers. There is no public IP that belongs to you, so there is nothing to forward a port to. You can confirm it quickly: if the address in your router’s WAN status starts with 100.64. through 100.127., or it simply does not match what a “what is my IP” site shows you, you are behind CGNAT.
The fix
Rent a cheap VPS. It has something your home connection does not: a real, static public IP. Then:
- Your home box opens one outbound WireGuard tunnel to the VPS. CGNAT is happy to allow outbound connections.
- The VPS forwards the port you care about down that tunnel to your home box.
- The outside world connects to the VPS IP, and the traffic lands on your home server.
What you need
- A VPS running wg-easy with a public IP, from the previous guide. A tiny plan is plenty.
- A home box running the service you want to expose. Here it is a Minecraft server on TCP
25565. - Root or sudo on both.
Step 1: Add a tunnel client for your home box
On the VPS, open the wg-easy panel and click New Client. Name it something you will recognise, like home-server.
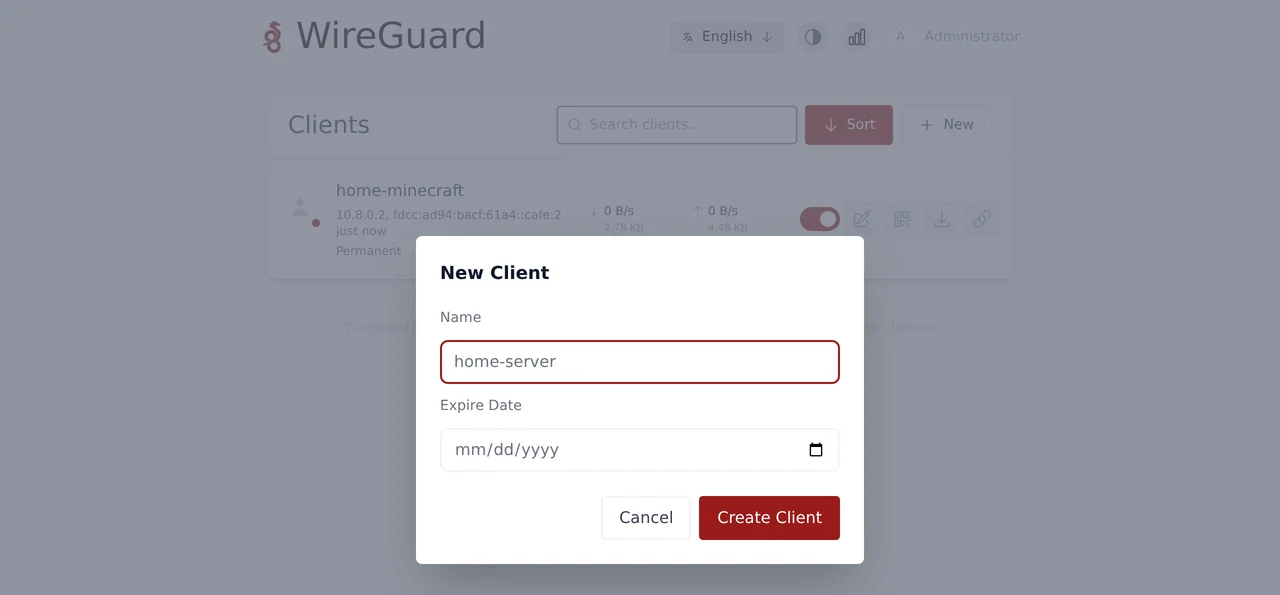
It appears in the list right away with a tunnel address. Write down that address, it is the key to everything below. In this guide the home box is 10.8.0.2.
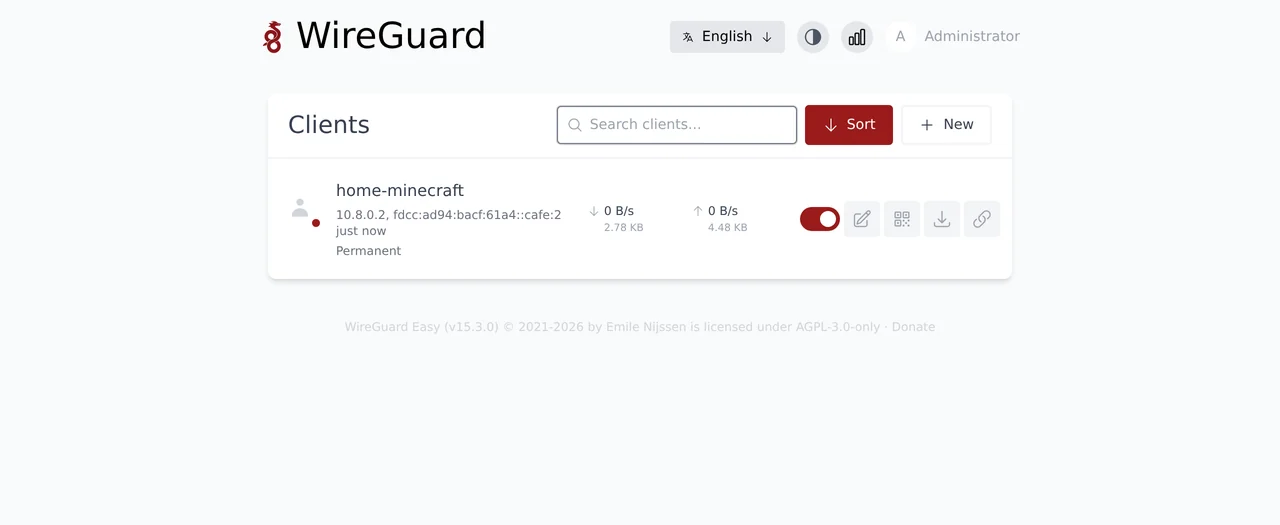
Download that client’s configuration (the download icon on its row). You will move it to the home box next.
Step 2: Bring up the tunnel on the home box
Put the config on your home box and install WireGuard. On a Debian or Ubuntu home box:
apt install -y wireguard
# copy the downloaded config into place
mv home-server.conf /etc/wireguard/wg0.conf
Now make two edits to /etc/wireguard/wg0.conf. This part matters:
- Change
AllowedIPsto only the tunnel subnet,10.8.0.0/24. The default routes all your home traffic through the VPS, which you do not want for a server that just needs to be reachable. - Add
PersistentKeepalive = 25under the[Peer]section. This is what makes CGNAT work. It sends a tiny packet every 25 seconds so the carrier keeps the path open and the VPS can always reach you.
The [Peer] block should end up like this:
[Peer]
PublicKey = <your server public key, already filled in>
PresharedKey = <already filled in>
AllowedIPs = 10.8.0.0/24
Endpoint = YOUR_VPS_IP:51820
PersistentKeepalive = 25
Bring it up and enable it on boot:
wg-quick up wg0
systemctl enable wg-quick@wg0
Check the tunnel is live:
wg show
ping -c 3 10.8.0.1
A recent handshake and replies from 10.8.0.1 (the VPS end of the tunnel) mean you are connected. Make sure your Minecraft server is running and listening on 25565 on this box.
Step 3: Forward the port on the VPS
Here is the one twist. wg-easy runs WireGuard inside a Docker container, so the tunnel interface wg0 lives in the container, not on the host. Traffic therefore takes two short hops: the host hands the public port to the container, and the container sends it down the tunnel. It is a handful of rules, run once.
First, on the VPS host, find the wg-easy container’s address and turn on forwarding:
CID_IP=$(docker inspect wg-easy -f '{{range .NetworkSettings.Networks}}{{.IPAddress}}{{end}}')
echo "$CID_IP"          # e.g. 10.42.42.42
sysctl -w net.ipv4.ip_forward=1
Send the public port to the container (replace eth0 with your VPS’s public interface):
iptables -t nat -A PREROUTING  -i eth0 -p tcp --dport 25565 -j DNAT --to-destination "$CID_IP":25565
iptables -t nat -A POSTROUTING  -d "$CID_IP" -p tcp --dport 25565 -j MASQUERADE
iptables -I FORWARD -p tcp -d "$CID_IP" --dport 25565 -j ACCEPT
Then, inside the container, send it on down the tunnel to your home box (10.8.0.2):
docker exec wg-easy iptables -t nat -A PREROUTING  -p tcp --dport 25565 -j DNAT --to-destination 10.8.0.2:25565
docker exec wg-easy iptables -t nat -A POSTROUTING -o wg0 -j MASQUERADE
docker exec wg-easy iptables -I FORWARD -p tcp -d 10.8.0.2 --dport 25565 -j ACCEPT
That is it. To forward a different service, change 25565 to your port and 10.8.0.2 to your home box’s tunnel IP. For a UDP service (Minecraft Bedrock is UDP 19132) swap -p tcp for -p udp.
Step 4: Test it from outside
Test from a network that is not your home LAN (mobile data is perfect), so you are really coming in from the internet. Point a port check or your Minecraft client at your VPS IP, not your home IP:
nc -vz YOUR_VPS_IP 25565Or just add YOUR_VPS_IP as a server in the Minecraft client. It shows up online, with your home server’s MOTD and player count, served straight from the box on your desk. A quick status query against the VPS confirms the whole chain end to end:
$ mcstatus YOUR_VPS_IP status
version: Paper 1.21.11
players: 0/20
motd: "1337 Hosting - home server via VPS tunnel"
The player connects to the VPS, and the packets come out on your home server behind CGNAT. No router port forward, no public IP at home.
Step 5: Make it survive reboots
The host rules reset on reboot and the container rules reset whenever the wg-easy container restarts, so wrap them in a small boot-time service. Save this as /usr/local/sbin/wg-portforward.sh:
#!/usr/bin/env bash
set -e
PORT=25565          # your service port
CLIENT_IP=10.8.0.2  # your home box tunnel IP
PUB_IF=eth0         # your VPS public interface

CID_IP=$(docker inspect wg-easy -f '{{range .NetworkSettings.Networks}}{{.IPAddress}}{{end}}')
sysctl -w net.ipv4.ip_forward=1

add() { iptables "$@" 2>/dev/null || true; }
# host: public port -> container
add -t nat -C PREROUTING -i "$PUB_IF" -p tcp --dport "$PORT" -j DNAT --to-destination "$CID_IP":"$PORT" || \
  iptables -t nat -A PREROUTING -i "$PUB_IF" -p tcp --dport "$PORT" -j DNAT --to-destination "$CID_IP":"$PORT"
iptables -t nat -C POSTROUTING -d "$CID_IP" -p tcp --dport "$PORT" -j MASQUERADE 2>/dev/null || \
  iptables -t nat -A POSTROUTING -d "$CID_IP" -p tcp --dport "$PORT" -j MASQUERADE
iptables -C FORWARD -p tcp -d "$CID_IP" --dport "$PORT" -j ACCEPT 2>/dev/null || \
  iptables -I FORWARD -p tcp -d "$CID_IP" --dport "$PORT" -j ACCEPT
# container: -> tunnel
docker exec wg-easy iptables -t nat -A PREROUTING  -p tcp --dport "$PORT" -j DNAT --to-destination "$CLIENT_IP":"$PORT"
docker exec wg-easy iptables -t nat -A POSTROUTING -o wg0 -j MASQUERADE
docker exec wg-easy iptables -I FORWARD -p tcp -d "$CLIENT_IP" --dport "$PORT" -j ACCEPT
Make it run at boot, after Docker:
chmod +x /usr/local/sbin/wg-portforward.sh
cat > /etc/systemd/system/wg-portforward.service <<'UNIT'
[Unit]
After=docker.service
Requires=docker.service
[Service]
Type=oneshot
ExecStart=/usr/local/sbin/wg-portforward.sh
RemainAfterExit=yes
[Install]
WantedBy=multi-user.target
UNIT
systemctl enable --now wg-portforward.service
Now the forward comes back on its own after a reboot or a container update.
The short version
# 1. In wg-easy: New Client -> "home-server", note its tunnel IP (10.8.0.2)

# 2. On the home box: install the config, then edit it:
#    AllowedIPs = 10.8.0.0/24  and  PersistentKeepalive = 25
wg-quick up wg0 && systemctl enable wg-quick@wg0

# 3. On the VPS: forward the port down the tunnel
CID_IP=$(docker inspect wg-easy -f '{{range .NetworkSettings.Networks}}{{.IPAddress}}{{end}}')
sysctl -w net.ipv4.ip_forward=1
iptables -t nat -A PREROUTING -i eth0 -p tcp --dport 25565 -j DNAT --to-destination "$CID_IP":25565
iptables -t nat -A POSTROUTING -d "$CID_IP" -p tcp --dport 25565 -j MASQUERADE
iptables -I FORWARD -p tcp -d "$CID_IP" --dport 25565 -j ACCEPT
docker exec wg-easy iptables -t nat -A PREROUTING -p tcp --dport 25565 -j DNAT --to-destination 10.8.0.2:25565
docker exec wg-easy iptables -t nat -A POSTROUTING -o wg0 -j MASQUERADE
docker exec wg-easy iptables -I FORWARD -p tcp -d 10.8.0.2 --dport 25565 -j ACCEPT

# 4. Connect to YOUR_VPS_IP:25565 from outside
The VPS in the middle does very little work, so the smallest plan handles it. If you want a stable static IPv4 and low latency for European players, our NVMe VPS nodes in the Frankfurt metro fit this perfectly, one dedicated IPv4 is included and they deploy in under a minute.
One consequence worth knowing: forwarding a port puts the VPS IP in front of your home server, so that address is now the one people can attack. For a private service it rarely matters. For a public Minecraft server it eventually does, and that is what Shield covers.
Frequently asked questions
Why can't I just port forward on my router with Starlink?
Starlink and most 4G/5G networks use CGNAT (carrier-grade NAT). Your router gets a private address, not a public one, so there is no public IP to forward to and your ISP controls the real edge. Port forwarding on your own router does nothing. A VPS with a real static IP gives you an edge you do control.
Does the home server need its own public IP?
No. That is the whole point. The home box makes one outbound WireGuard connection to the VPS, which CGNAT allows, and the VPS carries inbound traffic back down that tunnel. Only the VPS needs a public IP.
Will this add lag to my game server?
It adds one hop through the VPS, so latency is roughly your home-to-VPS round trip. Pick a VPS close to you or your players and it is usually a few milliseconds. A nearby Frankfurt-metro node is a good choice for European players.
Is PersistentKeepalive really necessary?
Behind CGNAT, yes. Without it the carrier NAT mapping for your tunnel times out when idle and inbound packets stop arriving until the home box sends something again. PersistentKeepalive = 25 keeps the mapping open so the VPS can always reach home.
Can I forward more than one port, or UDP?
Yes. Repeat the DNAT rules for each port and protocol. Minecraft Java is TCP 25565. Minecraft Bedrock is UDP 19132, so swap -p tcp for -p udp. The same pattern forwards game servers, a home web app, SSH, or anything else.
Related guides
VPN
Set up a WireGuard VPN on Debian 13 with a web UI (wg-easy)
Beginner · 10 min
Game Servers
Run a Minecraft server on Debian 13 with PaperMC (systemd, hardened, backups)
Intermediate · 20 min
Self-Hosting
Build a private seedbox on Debian 13: qBittorrent, Sonarr, Radarr, behind a VPN kill-switch
Advanced · 30 min